IP 카메라를 코드로 제어하려면 ONVIF라는 표준 프로토콜을 이해해야 합니다. 이 글에서는 ONVIF의 기본 개념부터 Python으로 카메라의 인코더 설정을 조회하고 변경하는 방법까지 단계적으로 설명합니다.
들어가기 전에
https://newbiecs.tistory.com/441
ONVIF XML과 SOAP에 대해서 알아보고 REST API와 비교
https://newbiecs.tistory.com/440 ONVIF로 IP 카메라 설정 제어IP 카메라를 코드로 제어하려면 ONVIF라는 표준 프로토콜을 이해해야 합니다. 이 글에서는 ONVIF의 기본 개념부터 Python으로 카메라의 인코더 설
newbiecs.tistory.com
XML이란?
XML(eXtensible Markup Language)은 데이터를 태그로 감싸서 표현하는 마크업 언어입니다.
<tt:Resolution>
    <tt:Width>3840</tt:Width>
    <tt:Height>2160</tt:Height>
</tt:Resolution>- 여는 태그(<tt:Width>)와 닫는 태그(</tt:Width>) 사이에 값이 들어갑니다.
- 태그는 중첩이 가능하며, 이 구조를 트리(tree) 라고 합니다.
- token="VideoEncoderToken-02-0" 처럼 태그 안에 추가 정보를 넣는 것을 속성(attribute)이라고 합니다.
SOAP이란?
SOAP(Simple Object Access Protocol)은 HTTP 위에서 XML로 함수를 원격 호출하는 프로토콜입니다.
쉽게 말해 "카메라에게 함수를 XML로 포장해서 HTTP로 보내는 방식" 입니다.
[내 PC]                        [카메라]
   |  HTTP POST /onvif/media   |
   |  Content-Type: soap+xml   |
   |-------------------------->|
   |  HTTP 200 OK (XML 응답)   |
   |<--------------------------|
모든 SOAP 메시지는 다음 구조를 가집니다.
<s:Envelope>       <!-- 편지 봉투 -->
  <s:Body>         <!-- 편지 내용 (실제 요청) -->
    <trt:GetVideoEncoderConfiguration>
        ...
    </trt:GetVideoEncoderConfiguration>
  </s:Body>
</s:Envelope>
네임스페이스 tt vs trt
XML에서 같은 이름의 태그가 여러 표준에서 쓰일 때 충돌을 막기 위해 네임스페이스를 사용합니다.
| 접두사 | URI | 역할 |
| tt: | http://www.onvif.org/ver10/schema | 데이터 타입 (명사) |
| trt: | http://www.onvif.org/ver10/media/wsdl | 서비스 액션 (동사) |
- trt: 는 카메라에게 "무엇을 해달라"고 요청하는 함수명입니다.
- tt: 는 그 요청 안에 담기는 실제 데이터 필드입니다.
<trt:SetVideoEncoderConfiguration>  ← 동사 (행동)
    <trt:Configuration>
        <tt:Name>VideoEncoder-02</tt:Name>       ← 명사 (데이터)
        <tt:FrameRateLimit>15</tt:FrameRateLimit> ← 명사 (데이터)
    </trt:Configuration>
</trt:SetVideoEncoderConfiguration>
Encoder란?
IP 카메라는 센서에서 촬영한 원본 영상을 그대로 네트워크로 전송하지 않습니다.
- 원본 영상 (RAW 데이터)은 용량이 매우 크기 때문에, 카메라 내부의 Video Encoder가 영상을 압축(인코딩)한 뒤 RTSP 스트림 형태로 외부에 전송합니다.
- ONVIF의 Media Service는 바로 이 Video Encoder 설정을 조회하고 변경하는 역할을 담당합니다.
카메라 센서
    ↓
원본 영상(RAW)
    ↓
Video Encoder
    ↓
H264 / H265 압축
    ↓
RTSP 스트림 생성
    ↓
NVR / VMS / AI 서버
ONVIF란?
ONVIF(Open Network Video Interface Forum)는 제조사가 달라도 IP 카메라를 동일한 방식으로 제어할 수 있게 만든 국제 표준 프로토콜입니다. 삼성, 한화, Hikvision 등 대부분의 IP 카메라가 지원합니다.
| 서비스 | 경로 | 기능 |
| Device Service | /onvif/device_service | 장치 정보, 시간 설정 |
| Media Service | /onvif/media_service | 스트림, 인코더 설정 |
| PTZ Service | /onvif/ptz_service | 카메라 뱡향 제어 |
카메라 프로파일 구조
ONVIF에서 Profile은 비디오 소스, 인코더, 오디오 등 여러 설정을 하나로 묶은 세트입니다.
각 객체는 고유한 token으로 식별됩니다.
| 프로파일 토큰 | 이름 | 인코더 토큰 | 해상도 | FPS |
| DefaultProfile-01-0 | MJPEG | VideoEncoderToken-01-0 | 1920x1080 | 30 |
| DefaultProfile-02-0 | H.264 | VideoEncoderToken-02-0 | 3840x2160 | 30 |
| DefaultProfile-03-0 | H.265 | VideoEncoderToken-03-0 | 1920x1080 | 30 |
| DefaultProfile-04-0 | MOBILE | VideoEncoderToken-04-0 | 640x480 | 10 |
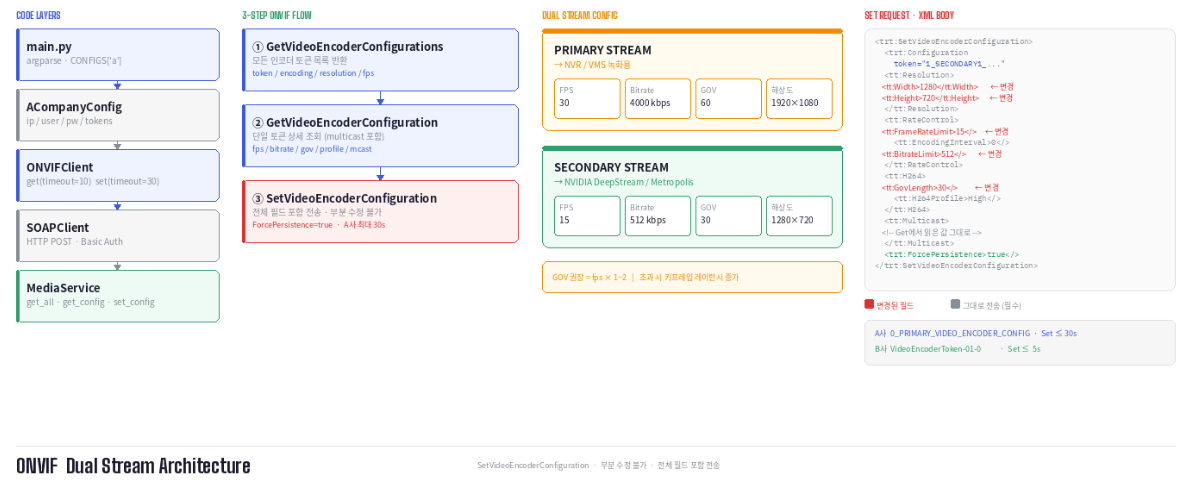
제조사마다 다른 ONVIF 구현
ONVIF는 표준이지만, 제조사마다 세부 구현이 다릅니다. 실제로 A사와 B사 카메라를 연동하면서 겪은 차이점을 정리했습니다.
인코더 토큰 명명 방식
- 같은 ONVIF 표준을 따르지만 토큰 이름 규칙이 완전히 다릅니다.
- 두 제조사 모두 Basic 인증을 사용하지만, Set 요청에 대한 응답 시간 차이가 있습니다. A사는 설정 적용 후 스트림을 재시작하는 과정에서 최대 30초가 소요됩니다.
| 항목 | A사 | B사 |
| 토큰 형식 | 0_PRIMARY_VIDEO_ENCODER_CONFIG | VideoEncoderrToken-01-0 |
| 인증 방식 | Basic Auth | Basic Auth |
| Set 응답 시간 | 최대 30초 | 5초 이내 |
config/base.py - 공통 설정
class BaseConfig:
    ip: str = ''
    user: str = 'admin'
    pw: str = ''

    media_service_path: str = 'onvif/media_service'
    device_service_path: str = 'onvif/device_service'

    # Get은 짧게, Set은 카메라 적용 시간 고려해서 길게
    get_timeout: int = 10 # 미디어 서비스 경로: GetVideoEncoderConfigurations, SetVideoEncoderConfiguration 등에서 사용
    set_timeout: int = 30 # 디바이스 서비스 경로: GetSystemDateAndTime 등에서 사용

    NAMESPACES = {
        'soap': 'http://www.w3.org/2003/05/soap-envelope',
        'tt':   'http://www.onvif.org/ver10/schema',
        'tds':  'http://www.onvif.org/ver10/device/wsdl',
        'trt':  'http://www.onvif.org/ver10/media/wsdl',
        'tr2':  'http://www.onvif.org/ver20/media/wsdl',
    }

    """예시) 카메라별 config에서 아래와 같이 인코더 토큰과 기본 설정을 정의할 수 있습니다."""
    # Primary Stream (현재 default 값들 → 녹화용)
    default_fps: int = 30
    default_bitrate: int = 4000   # kbps
    default_gov: int = 60         # 30fps × 2sec
    default_profile: str = 'High'

    # Secondary Stream (NVIDIA Analytics용 → 별도 설정 필요)
    analytics_fps: int = 15
    analytics_bitrate: int = 512   # 혹은 1000 kbps
    analytics_gov: int = 30        # 15fps × 2sec
    analytics_profile: str = 'High'  # or 'Main' (모델 요구사항 확인)
    # analytics_resolution: Resolution = (1280, 720)  # or 960x540
core/soap.py - HTTP 전송 및 인증 처리
class SOAPClient:
    def request(self, service_path: str, body_xml: str, timeout: int = None) -> str:
        url = f'http://{self.config.ip}/{service_path}'
        envelope = (
            '<?xml version="1.0" encoding="UTF-8"?>'
            '<s:Envelope xmlns:s="http://www.w3.org/2003/05/soap-envelope">'
            f'<s:Body>{body_xml}</s:Body>'
            '</s:Envelope>'
        )
        headers = {'Content-Type': 'application/soap+xml; charset=utf-8'}

        resp = requests.post(url, data=envelope, headers=headers,
                             auth=(self.config.user, self.config.pw),  # Basic Auth
                             timeout=timeout)
        if resp.status_code == 200:
            return resp.text
services/media_service.py - 인코더 조회 및 변경
카메라는 센서에서 받은 원본 영상을 바로 외부로 보내는 게 아니라, 내부 인코더 (Video Encoder) 가 설정값대로 압축(인코딩)한 뒤 그 결과물을 RTSP/ONVIF로 외부에 전송합니다.
class MediaService:
    SERVICE_PATH = 'onvif/media_service'

    def get_video_encoder_config(self, token: str) -> dict:
        body = (
            '<trt:GetVideoEncoderConfiguration '
            'xmlns:trt="http://www.onvif.org/ver10/media/wsdl">'
            f'<trt:ConfigurationToken>{token}</trt:ConfigurationToken>'
            '</trt:GetVideoEncoderConfiguration>'
        )
        raw = self.client.get(self.SERVICE_PATH, body)
        root = ET.fromstring(raw)

        enc   = root.find('.//trt:Configuration', NS)
        rate  = enc.find('tt:RateControl', NS)
        mcast = enc.find('tt:Multicast', NS)

        return {
            'token'   : enc.get('token'),
            'encoding': enc.findtext('tt:Encoding', namespaces=NS),
            'width'   : enc.findtext('.//tt:Width',  namespaces=NS),
            'height'  : enc.findtext('.//tt:Height', namespaces=NS),
            'fps'     : rate.findtext('tt:FrameRateLimit', namespaces=NS),
            'bitrate' : rate.findtext('tt:BitrateLimit',   namespaces=NS),
            # mcast, session_timeout 등 생략...
        }

    def set_video_encoder_config(self, config: dict) -> bool:
        # SetVideoEncoderConfiguration은 변경하지 않는 필드도
        # 전체를 포함해서 전송해야 합니다 (부분 수정 불가)
        body = f'''<trt:SetVideoEncoderConfiguration ...>
    <trt:Configuration token="{config['token']}">
        <tt:RateControl>
            <tt:FrameRateLimit>{config['fps']}</tt:FrameRateLimit>
            ...
        </tt:RateControl>
        <tt:Multicast>...</tt:Multicast>  ← Get으로 읽어둔 값 그대로 전송
    </trt:Configuration>
</trt:SetVideoEncoderConfiguration>'''

        raw = self.client.set(self.SERVICE_PATH, body)
        return 'SetVideoEncoderConfigurationResponse' in raw
main.py - 카메라 선택 실행
import argparse
import logging

from config.truen import TruenConfig
from config.hanwha import HanwhaConfig
from core.client import ONVIFClient
from core.exceptions import ONVIFError
from services.media_service import MediaService

CONFIGS = {
    'A': AConfig,
    'B': BConfig,
}

logging.basicConfig(
    level=logging.DEBUG,
    format='%(asctime)s [%(levelname)s] %(name)s - %(message)s',
    datefmt='%Y-%m-%d %H:%M:%S',
)
logger = logging.getLogger(__name__)


def main():
    parser = argparse.ArgumentParser(description='ONVIF 카메라 제어')
    parser.add_argument('camera', choices=CONFIGS.keys(),
                        help=f"카메라 종류: {', '.join(CONFIGS.keys())}")
    args = parser.parse_args()

    config = CONFIGS[args.camera]()
    logger.info("카메라: %s (%s)", args.camera, config.ip)

    client = ONVIFClient(config)
    media  = MediaService(client)

    # 사용 가능한 인코더 토큰 목록 출력
    all_configs = media.get_all_encoder_configs()
    for c in all_configs:
        logger.info("토큰: %-40s %s %sx%s fps=%s",
                    c['token'], c['encoding'], c['width'], c['height'], c['fps'])

    # 첫 번째 토큰 (PRIMARY) 설정 조회 및 변경
    encoder_token = config.encoder_tokens[0]
    enc_config = media.get_video_encoder_config(encoder_token)
    logger.info("현재 설정: %s", enc_config)

    enc_config['fps'] = '30' # ✔️
    media.set_video_encoder_config(enc_config) ✔️


if __name__ == '__main__':
    try:
        main()
    except ONVIFError as e:
        logger.error("ONVIF 오류: %s", e)
위와 같이 설정하면 fps를 30으로 변경할 수 있습니다.
ONVIF Media Service로 수정 가능한 것들
| 항목 | 예시값 | 비고 |
| 해상도 (Width/Height) | 1920x1080, 720x480 | Primary/Secondary 분리 |
| FPS (FrameRateLimit) : 1초에 몇 장의 프레임(이미지)을 보여주는가 |
30, 15 | Secondary는 15 권장 |
| Bitrate (Bit;bits per second, BitrateLimit) : 영상 품질을 위해 초당 얼마나 데이터를 사용할지 |
1024kbps | |
| GOV (GovLength) : 얼마나 자주 "완전한 기준 프레임(I-frame)"을 넣을지 |
60, 30 | fps * 1~2 권장 |
| H264 Profile | High, Main, Baseline | |
| Encoding | H264, H265 |
이 외에도 할 수 있는 것들
- VideoEncoder 설정 외에도 ONVIF Media Service는 아래 기능들을 제공한다.
- Profile 관리 카메라의 인코더, 소스, PTZ 설정을 하나로 묶는 단위. GetProfiles/CreateProfile/DeleteProfile로 관리한다.
- VideoSource 설정 밝기, 대비, 채도, 화이트밸런스 등 카메라 영상 품질 파라미터를 조정할 수 있다.
- RTSP 스트림 URL 조회 GetStreamUri를 통해 카메라의 RTSP 스트림 주소를 가져올 수 있다. NVR 연동이나 DeepStream 소스 등록에 사용된다.
- 스냅샷 URL 조회 GetSnapshotUri로 정지 이미지를 가져올 수 있는 URL을 조회한다.
'Language > Python' 카테고리의 다른 글
| ONVIF XML과 SOAP에 대해서 알아보고 REST API와 비교 (0) | 2026.05.28 |
|---|---|
| [Python] Iterator, Generator 정리 (0) | 2025.12.26 |
| [FastAPI] 'Unknown Column' 에서 Alembic 사용법 (SQLAlchemy 스키마 동기화) (0) | 2025.06.15 |
| 'google-api-python-client'를 사용한 유튜브 데이터 가져오기 (3) (0) | 2023.09.04 |
| 'google-api-python-client'를 사용한 유튜브 데이터 가져오기 - pandas, argparse (2) (0) | 2023.08.29 |

댓글